Wednesday, February 4, 2015

Window Gel Clings | Valentine's Day

I hesitated for a moment to post this activity because my windows are filthy. On the outside, guys. The hard to clean part. At any rate, you have to promise to only look at the gorgeous window gel clings we made for Valentine's Day and to completely ignore the dirty windows. Let's just say it's our little secret, shall we? It would be so embarrassing if somehow these pictures got out on the internet and the entire world knew that I am not a perfect window-cleaner.
Window Gel Clings | Valentine's Day | The Science Kiddo
By now you are familiar with our window gel clings that are completely taste safe for kids. These sparkly window jelly tutorials have been some of our most popular posts here at The Science Kiddo! That makes me happy because it means lots of you in internet-land have beautifully decorated windows with happy kids to admire them.

For Valentine's Day we used heart cookie cutters and pink, purple, and red food coloring. We also used healthy doses of pink and purple glitter.
Window Gel Clings | Valentine's Day | The Science Kiddo
Please go to my original post to grab the recipe and instructions.

Customize them however you want to! We have now made spring/summer window gel clings, Halloween jellies, and Christmas gel stickers. Our house looks naked without gel clings in our windows.

Enjoy your beautiful decorations and let me know how they work! Better yet, stop by Facebook and upload a picture of your heartful creations to inspire all of us!

This post was inspired by a lovely series called 14 Days of Love. Check it out to find over a dozen beautiful love-inspired activities from bloggers from all over the web!
14 Days of Love Blog Tour | The Science Kiddo
*This post contains affiliate links. Please see our disclosure policy.


powered by TinyLetter

Tuesday, February 3, 2015

Our Month-Long Vacation

I have been out of town for one whole month. One month. It has been amazing, but it is so nice to be home.

We spent Christmas and New Year's in Denver with my husband's family. They love to stay at home, play with the kids, read, joke around, and chat. It's very low key and enjoyable. I end up taking long naps and learning how to sleep in again when we go to Denver. I love it.

In January we hopped over to Salt Lake to visit my family. The pace is much different there! They drive up and down the Wasatch Front visiting friends and family, host big dinner parties, go to museums, stay up late, and always squeeze in an adventure in the mountains. I end up reconnecting with true friends and getting very little sleep when we go to Salt Lake. I love it.

Now I am home, back to my life of biking, homeschooling, and blogging. Back to Portland where I don't have to use an entire bottle of lotion to keep my hands from cracking and where I don't have to drive in snow, but I do get frowned at when I feed my kids Cheetos in public. We don't live near any family here and often I feel sad about that, but I love my life in Portland. I love it so much. It is home.

Saturday, January 31, 2015

Flying Cupids | Static Electricity for Valentine's Day

Static electricity is awesome. I'm just going to say it. Playing and experimenting with static electricity provides children with some of their earliest hands-on physics lessons.

You can see static electricity in action when a child goes down a plastic slide at the park only to arrive at the bottom with crazy hair that is sticking straight up and all over. You can feel static electricity when you rub your feet on carpet and then touch a metal doorknob. Today we are going to harness the power of static electricity in a fun activity for Valentine's Day. Get your balloons and your crazy hair ready!
Total Time: About 5 minutes
Safety Concerns: None.

Materials You Need:
Tissue paper
Markers
Scissors
An inflated balloon
Wool, flannel, or fleece fabric (A head of hair also works perfectly!)

Flying Cupids | Static Electricity for Valentine's Day | Hands-On Science for Kids
Directions:
  • Draw a cupid on a piece of tissue paper. You can either do this freehand or trace a cupid onto the tissue paper like I did! (I'm no artist.)
  • Cut out the tissue paper cupid and put it on a flat surface.
  • Rub the balloon on the fabric or hair for about 10 seconds.
  • Hold the balloon a few inches over the tissue paper cupid and see what happens. If the balloon has acquired a good static charge, the cupid should jump right up and stick to the balloon!
  • Have fun making your cupid fly!
Print These Instructions
Flying Cupids | Static Electricity for Valentine's Day | Hands-On Science for Kids
So what is going on with the balloon? Why does rubbing a balloon on your head make your hair go crazy and then attract tissue paper to it?
Flying Cupids | Static Electricity for Valentine's Day | Hands-On Science for Kids
Simply put, when the balloon is rubbed against fabric or hair, electrons are transferred to the balloon, giving it an overall negative charge. This negative charge attracts the tissue paper cupids, making them stick!

*This post contains affiliate links. Please see our disclosure policy.


powered by TinyLetter


Saturday Science

STEM Saturday | Science Math Engineering Technology for Kids
And now on to our STEM Saturday link up! Check out our wonderful co-hosts and link up your own math and science activities:
Scented Hearts Experiment from Suzy Homeschooler
Dissolving Candy Hearts Experiment from Lemon Lime Adventures

Saturday, January 24, 2015

Ice Art | Winter Science

The moment I saw these beautiful creations from The Artful Parent and Mom to 2 Posh Lil Divas I knew we were going to have to try this hands-on science activity out for ourselves.

We have a history with salt and ice after all! We have learned in several different ways how salt melts ice. First we did our Fishing for Ice experiment. Then we made ice cream and fruity slushy drink using the super cooling power of a salty icey mixture. It's only natural we should do an artsy science experiment with salt and ice now!

This experiment is quick, easy to clean up, and completely dazzling!
Ice Art | Winter Science | The Science Kiddo
Total Time: 5-30 minutes, depending on how engaged the kids are!
Safety Concerns: None.
Ice Art | Winter Science | The Science Kiddo
Materials You Need:
Ice cubes
Table salt
Liquid Watercolors
Paintbrushes
My kids also used glitter glue and glitter, which added a very festive flare, but it is certainly not required!
Ice Art | Winter Science | The Science Kiddo
Directions:
  • Place the ice cubes in a tub, a casserole dish, or a baking sheet.
  • Have the kids sprinkle salt over the ice. Wait a few minutes and watch how the individual grains of salt melt tunnels into the ice.
  • Paint the ice using your liquid watercolors. Watch how the colors fall into the caves created by the salt. Admire your beautiful creations!
Ice Art | Winter Science | The Science Kiddo
Want more ways to play and learn with ice? Check out these six simple ice science activities!

*This post contains affiliate links. Please see our disclosure policy.


powered by TinyLetter


Saturday Science

STEM Saturday | Science Math Engineering Technology for Kids
And now on to our STEM Saturday link up! Check out our wonderful co-hosts and link up your own math and science activities:


Building Structures with Candy Hearts from Lemon Lime Adventures
Bubbling Pine Cones from Frogs Snails and Puppy Dog Tails
Building Rockets with Shapes from Stir the Wonder
Waves from Suzy Homeschooler
PVC Pipe Heart Engineering Project for Kids from Little Bins for Little Hands


Friday, January 23, 2015

Science With Ice | Unique Hands-On Play

Winter is the perfect time to have some science fun with ice. Over the past few months I have been delighted to see so many great ways to learn with ice in our STEM Saturday Linkup. The thing I love most about these activities is that they are all very easy to set up since they only use basic household materials. Plus, they are uniquely educational, fun, creative, and simple to clean up, too!
Science With Ice | Unique Hands-On Play
Be sure to stop by STEM Saturday tomorrow to see the best science and math posts linked up from all over the web!
Science With Ice | Unique Hands-On Play
Fishing for Ice from the Science Kiddo
Lego Science | An Ice Excavation Experiment from Lemon Lime Adventures 
Ice Cube Sculptures from Teaching Mama
Science With Ice | Unique Hands-On Play
Magnetic Ice Science Play from Little Bins for Little Hands
Reinforcing Science Concepts from Planet Smarty Pants


powered by TinyLetter

Tuesday, January 20, 2015

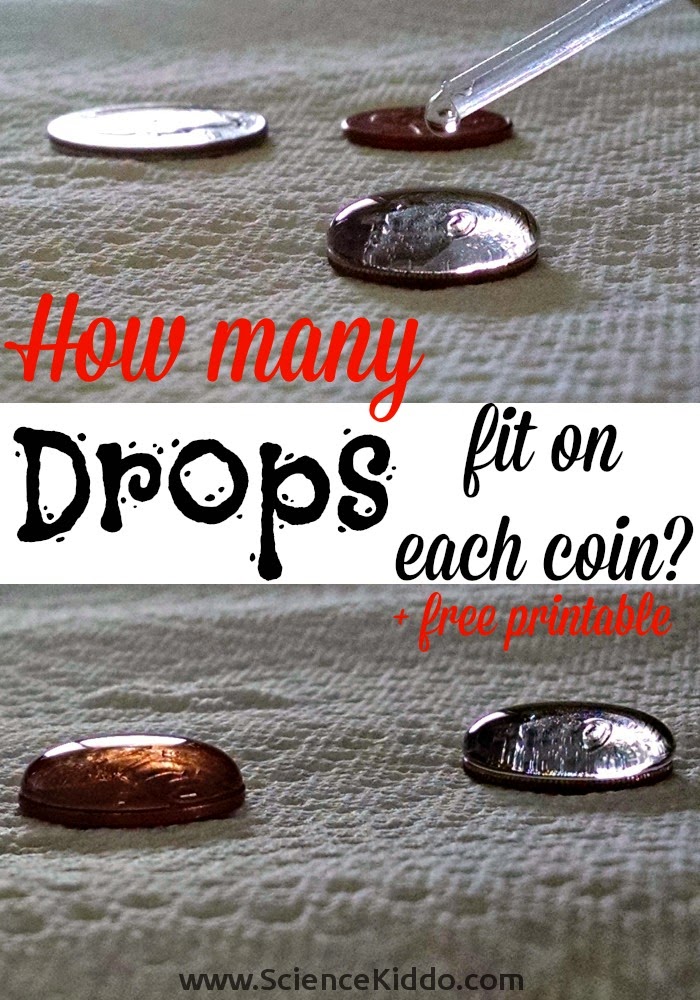
Surface Tension | Drops of Water on a Coin + Free Printable

I am sure you have seen this experiment done before. Ya know, the one where you see how many drops of water you can fit onto a penny? We added an extra dimension to this classic experiment by comparing how many drops of water will fit onto each coin (penny, nickel, dime, and quarter) and tracking the data on a table to add a more mathematical and scientific element to it. This is also fantastic fine motor skill practice for kids as they learn to use and control a plastic pipette!

Which coin do you think will hold the most drops of water? Make an educated guess before you begin. This is called your hypothesis.
Surface Tension | Drops of Water on a Coin + Free Printable!
Total Time: About 5 minutes
Safety Concerns: None.

Materials You Need:
A cup of water
A variety of coins (we used a penny, a nickel, a dime, and a quarter)
Plastic pipette
Free printable table to keep track of the results! (Remember to change the page orientation to landscape before printing.)

Surface Tension | Drops of Water on a Coin + Free Printable!
Directions:
  • Set the coin on a flat surface.
  • Fill a plastic pipette with water.
  • Carefully squeeze out water drop by drop from the pipette onto the coin. Count how many drops fit on the coin before the dome breaks and the water spills over.
  • Keep track of your results on this free printable table! There is room to do three trials for each coin so you can average the trials together to see which coin holds the most water!
So why does a dome form when you drop water on the coin? And why does the dome eventually collapse?
Surface Tension | Drops of Water on a Coin + Free Printable!
The answer to this lies in the structure of the water molecule itself. Water is a polar molecule, meaning that it has a positive end and a negative end. The negative end of one molecule is attracted to the positive end of another molecule (similar to a magnet), which makes the molecules stick together tightly. The molecules on the surface are pulled inward and they stick together so strongly that they form a dome. This is called surface tension. Eventually, though, gravity overcomes this force and the dome breaks, spilling water over the sides of the coin.

For another fantastic (and colorful!) surface tension activity check out our magic milk fireworks! The kids will LOVE it.
Surface Tension | Drops of Water on a Coin + Free Printable!
So what were your results? Which coin held the most drops of water? Was your hypothesis correct? Why?


powered by TinyLetter
*This post contains affiliate links. Please see our disclosure policy.
 
This post is part of the A-Z STEM Series. Every day during the month of January we will be bringing you tons of awesome science, technology, engineering, and math activities to do with your kids! By the end of the month you'll have over 50 STEM activities to keep your kids busy learning.
Surface Tension | Drops of Water on a Coin + Free Printable!

Saturday, January 17, 2015

Party Cloud Dough | Glittery Fizz

Welcome to the most awesome sensory play this side of the Mississippi. It is soft and moldable, yet dry and crumbly. It is made of just two ingredients. After the kids are done shaping it and using it for imaginative sensory play, you can add vinegar and it becomes a really cool science activity. Prepare yourselves for some pretty outrageous fun. I call it Party Dough because of all the glitter and the "Ooh's" and "Aah's" that are elicited as the kids experiment and play!
Party Cloud Dough | Glittery Fizz | Science Play for Kids
We used the same basic recipe for Erupting Snow as found on Growing a Jeweled Rose. Since we wanted Party Dough we added food coloring (blue) and TONS of glitter of all colors. I also added a little bit of water to make it less crumbly and more moldable. It worked beautifully and the kids had a blast playing in it.
Party Cloud Dough | Glittery Fizz | Science Play for Kids
The kids had fun playing in it with all kinds of toys and tools. They scooped it into little cups, molded it into cookie cutters, made an igloo, stirred it, and ran their fingers through it just to see how it felt. (Note: Fizzy Cloud Dough is not edible.)
Party Cloud Dough | Glittery Fizz | Science Play for Kids
Once they were done with sensory play, we got out the vinegar and let the real magic begin. The kids used plastic pipettes to squirt the vinegar onto their Party Dough, squealing with delight as it fizzed and erupted into foamy bubbles. This was definitely the highlight of their play!
Party Cloud Dough | Glittery Fizz | Science Play for Kids
We even caught some of the glittery fizz on video!
Want more sensory play ideas? Check out our Play Gel, made from a surprising (and disturbing) source.

Craving more fizzy fun? Try building a film canister rocket (eye protection encouraged) or get directions to make your own fire extinguisher!

*This post contains affiliate links. Please see our disclosure policy. 


powered by TinyLetter


Saturday Science

STEM Saturday | Science Math Engineering Technology for Kids
And now on to our STEM Saturday link up! Check out our wonderful co-hosts and link up your own math and science activities:
Moon Math Game from Stir the Wonder
Valentine's Day Polygon Building from Lemon Lime Adventures

Monday, January 12, 2015

The Big Leap | City Living

It's amazing how one tiny decision can change your life.

Last week I talked about how we gave up our car, almost on a whim, and bought bikes and transit passes instead. After a year of carfree living in the suburbs we decided to take our experiment to a whole new level and move right into the city. As a lifelong suburbanite, this is one of the scariest things I have ever done!
City Living With Kids | Carfree With Kids
I mean, isn't the city dangerous? Isn't there a lot of crime? What about kids living in the city? Aren't kids supposed to have their own backyard, their own sandbox, their own fenced-in playground and treehouse? And don't even get me started on downsizing to fit into something we could afford in the city. How is a family of four supposed to squeeze into 750 sq ft and be happy?

Why we decided to move to the city was pretty simple. Ben commuted nearly an hour each way to work via bike and/or public transit. He left in the morning before the kids were awake and arrived back home in the evening just in time for dinner, then bedtime. It was no way to live. He saw the kids so little.

Initially we only had one criterion for our new dwelling. We wanted to be within a 20-minute bike commute to Ben's work. That was it. We just wanted him home more.

We could have bought a car, sure. We were 100% debt free and saving money every month. However, we had fallen in love with our carfree lifestyle. We loved biking, walking, and bussing. We loved the stress-free, simple, healthy, happy lifestyle carfree living afforded us. We knew that living in the city would simplify our life even more since it would be even easier to get around without a car.

Simplify your life?! It was amazing the reactions we got from people when we broke the news that we were giving up a decent-sized house and backyard to live in the city. It seemed to a lot of people that we were going against the American dream. We wanted no car, a smaller living space, less stuff, and more time as a family. Call us crazy. Many have.

So we did it. Our goal as a family is to live an interesting, meaningful, intentional life. Moving into the city fit that goal. We got rid of 50% of our stuff, packed up what was left, and squished it all into an apartment in the heart of Portland. We knew it was going to be different and maybe a little scary, but we also knew that if we hated it we could change our plans again.

Well, we haven't hated it at all. We LOVE it. We love the city. We love Portland. We have met some of the most amazing and interesting people in our community. City living has afforded us business and social opportunities that we never would have experienced in the suburbs. We are happier and healthier as a family than we have ever been before. We are thriving in the city. We are thriving with less stuff. We are thriving without a car.

One of the experiences we love the most is the opportunity we have to participate in the Sharing Economy. We donate our stuff and our time to non-profits like Free Geek, the Tool Share, the Kitchen Share, and Swap 'n' Play. I'll write about these meaningful organizations that bring the community together and allow us to share our resources and our knowledge with each other next time :) Stay tuned!


powered by TinyLetter